Please note that this feature is only available for those with annotation permissions within certain markets. If you would like to add this feature to your clinic's account, contact Tricefy Support to see if it can be enabled.
Annotations and notes are available when using the viewer. When annotating, measurements (such as height, width, length, angle) are pulled directly from the ultrasound system (metadata). The values rendered from these tools are for informational purposes only.
Annotations are purple while being created and turn green once set.
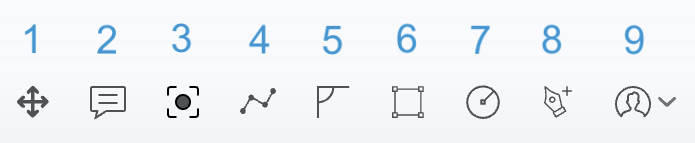
1) Move Cursor: Selecting the move cursor allows you to move the entire thumbnail (and any existing annotations) around the in the viewer frame. Using the scroll action from your mouse/touchpad will zoom the image in or out.
2) Create Note: When this tool is selected, press-and-hold an area on the image or cine clip until a blue dot and cursor appears. Enter the desired text next to the annotation and clicking away to remove focus. You can also edit the text or move the annotation by double clicking the dot to put the annotation in focus, then drag it to the desired area of the image.
- You can also leave a comment by selecting (double-clicking) any annotation on the drawing; a pop-up window displays for entering a message.
3) Snapshot: This tool takes a picture of the annotated drawing (or frame of a clip) and saves it as a new image appended to the study.
4) Line (caliper): This tool creates a line to connect two points on the image
- Press-and-hold on the image to begin the line and release to complete the line
5) Angle: This tool creates two connecting lines
- Double-click/tap and hold as you draw the first line
- Click/tap once and hold as you draw the second line

6) Square: This tool draws a square
- Press-and-hold as you move the move the cursor up or down to create a square
7) Ellipse: This tool creates an ellipse
- Press-and-hold as you move the cursor up or down to create an ellipse
8) Pen: This tool allows you to draw a free form line
- Press-and-hold as you drag the cursor to create your line

9) Show Annotations By: This menu lists everyone who has made annotations on the image. This menu is only visible if there are annotations.
- Select All to show all annotations
- Select a specific individual to show only annotations made by them
- Select None to view the image without any notes or annotations
Viewing and Removing Annotations
Annotations are designated a letter and its respective measurements are populated into the For Informational Purposes box:
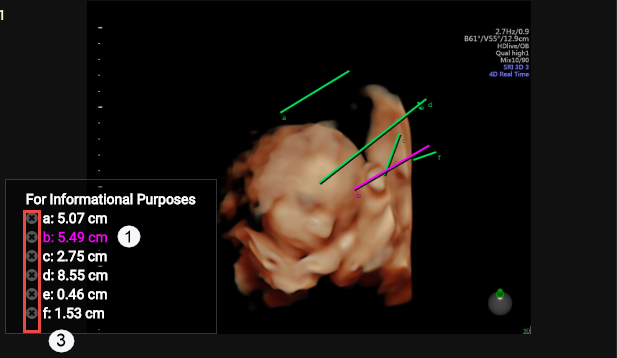
1) Hovering over a measurement in the For Informational Purposes box will highlight the associated annotation on the image
2) To view who made annotations and when annotations were created, open the Side Info Panel and select the Activity tab. The activity tab will say a note was added and show the letter associated with the annotation that was made.
3) To To remove an annotation, select the X next to the measurement listed in the For Informational Purposes box. The annotation associated with that measurement will be removed.
 Copyright ©