You can program a button on your ultrasound system to send study images Tricefy.
- P buttons -- Sends the image on the screen to the patient (or archive)
- End Exam -- Sends the entire study when the exam is complete
This is not a requirement, especially if you prefer your ultrasound system to send every study automatically.
Instructions for programming buttons vary depending on your ultrasound system. Here are some guidelines for popular brands:
GE Machines
- Volusons with Tricefy Inside - Please refer to Step 2 of our Getting Started Guide
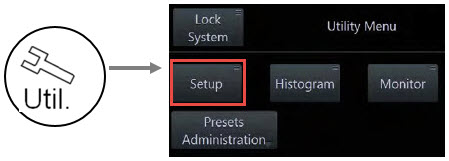
- Voluson E10
1) Press the Utilities button on the front of the ultrasound system
2) Select Setup
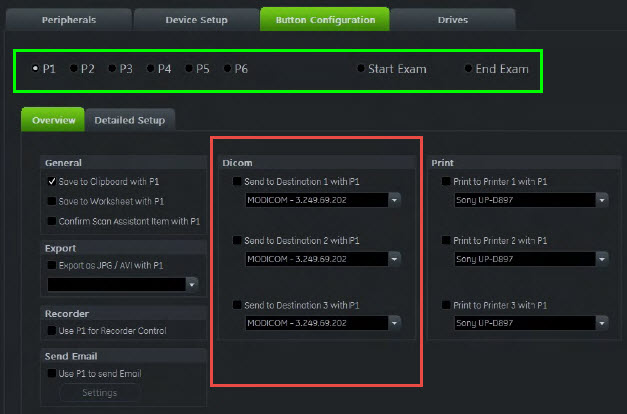
3) Click the Button Configuration tab
4) Choose to program the P1, P2, P3, P4, P5, or P6 button. This is based on preference and how you currently use the buttons.
- Select End Exam to send studies to Tricefy by pressing End Exam instead of a P button
5) Choose one of the three destinations (shown below in the red box) that you are not currently using. Select the Tricefy store (archive or patient) that we created when configuring the ultrasound system.
- Voluson E6 & E8:
1) Press the Utilities button on the front of the ultrasound system
2) Select System Setup
3) Select Connectivity under System Settings
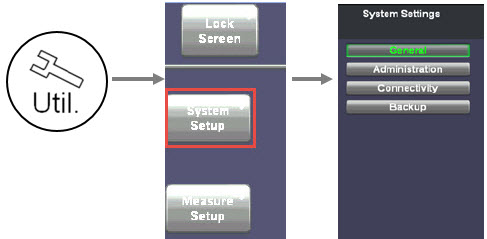
4) Click the Button Configuration tab
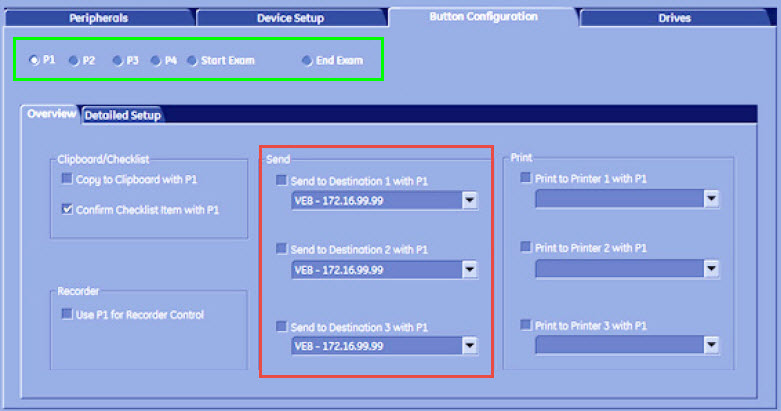
5) Choose to program the P1, P2, P3 or P4 button. This is based on preference and how you currently use the buttons.
- Select End Exam to send studies to Tricefy by pressing End Exam instead of a P button
6) Choose one of the three destinations (shown below in the red box) that you are not currently using. Select the Tricefy store (archive or patient) that we created when configuring the ultrasound system.
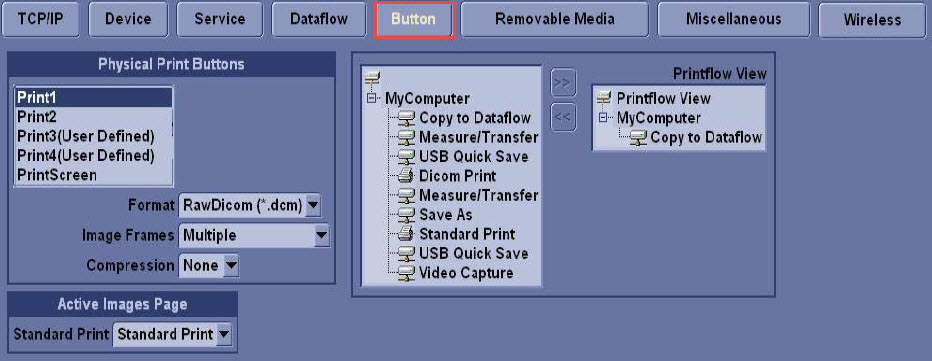
- LOGIQ A5/P5
1) Press the Utilities button on the front of the ultrasound system
2) Select the Connectivity tab at the top of the screen
3) Select the Button tab
4) In the Physical Print Buttons box, select Print3 or Print4, and choose JPG from the Compression drop-down menu
5) Select the Tricefy destination in the adjacent box
Samsung Machines
- Sonoview:
- Send button (located on the Patient Information screen)
- UGEO H60:
1) Press Enter on the keyboard to access the Setup screen and select Connectivity
2) Select Customize from the left-hand menu
3) Pick the button you would like to use to send images (S1, S2, or S3)
- Make sure the Store checkbox is selected
- Choose the Tricefy destination from the drop-down menu

- HS70A:
1) Select the cog icon on the side of the touch panel to access the Setup screen
2) Press the User-Defined Key button
3) Select either P1, P2, P3 or P4 to send studies to Tricefy
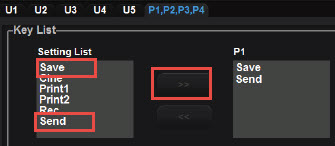
- Select Save under the Settings List
- Press >> to assign it to the P button
- Select Send under the Settings List
- Press >> to assign it to the P button
Note: You can choose to send studies by using the configured P button, or you can have studies sent at the end of the exam by pressing the End Exam button. Refer to the HS70/HM70 Configuration instructions for modifying your selection.
Philips Machines
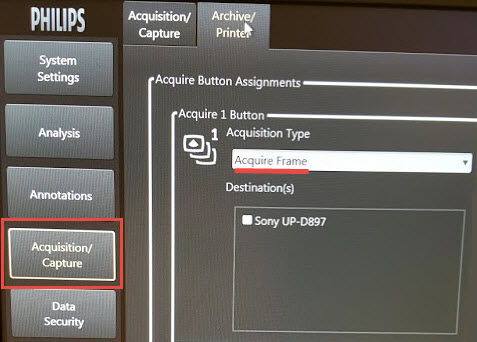
- Affiniti & Epiq
1) Press the Setup button on the LCD panel
2) Click Acquisition/Capture from the left-side menu
3) Select the Archive/Printer tab
4) Choose Acquire Frame from the Acquisition Type menu (for either Acquire 1 or Acquire 2 button)
5) Select the Tricefy destination from the Destination(s) box
If both of your Acquire buttons are in use, follow the alternative workflow:

 Copyright ©