New: Learn more by watching the video tutorial
An examination is uploaded to Tricefy, either by using your medical imaging device or other DICOM software. If the Patient ID exists in the Athena tablespace, the study will be sent to the patient's chart.
Viewing Tricefy Links or Documents in Athena
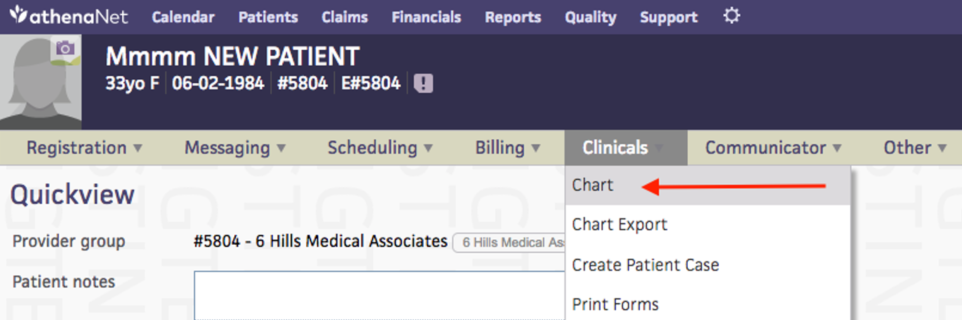
To view a Tricefy result in the Athena patient chart:
1) Open your patient's chart by navigating from the patient "Clinicals" menu or searching for the patient ID in the Athena search box.
2) Select the "Results" icon on the left sidebar of the screen to open Imaging Results. You can also see the results in the "Recent Activity" tab of the patient chart home page.
Viewing Tricefy Links in Athena
3a) Tricefy links in Athena will have a clickable "PACS link" (X-ray icon) in the result entry and "image available" subtitle as seen highlighted in red in the picture below
**Clicking on a Tricefy link will open the exam/study in the Tricefy viewer. You will be automatically logged into Tricefy if your Athena user is linked to your Tricefy user. If your Tricefy user is not linked to Athena, you will be directed to a Tricefy page to link your Athena user -- see the "Linking your Athena User to Tricefy" section further below for instructions.

Viewing Tricefy result PDFs in Athena
3b) Tricefy document attachments (PDFs) are a separate result entry in Athena. The Tricefy result PDF will have the subtitle of "Automatic imaging report sent by Tricefy" as seen highlighted in blue in the picture above.
Clicking on the "expand" icon will open the result panel. Scroll down to see the document page images. The full, high quality PDF can also be viewed by clicking the "View original image" link above the document viewer (see picture below)

Linking your Athena user to Tricefy
After clicking a Tricefy link in Athena for the first time, you will be prompted to link your Athena user profile to your Tricefy user profile.
Simply click the "I already have Tricefy login" link at the top (see picture below) and sign in to Tricefy to link your Athena user to your Tricefy user.

Viewing Athena Imaging Result Status in Tricefy
You can confirm it was sent by selecting the study on your Study List and opening the side Info Panel. Scroll towards the bottom of the panel and select the Interface Status Details link.
Note: This link is only available for Athena users.

If the status is "success" (shown below in the red box), it means that the examination was successfully sent to the patient's chart:
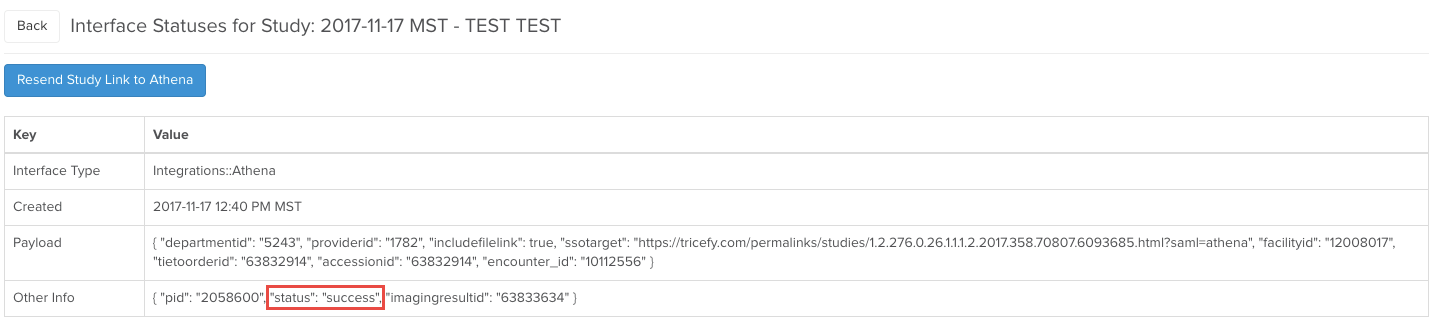
- Select Back to return to your Study List
- Select Resend Study Link to Athena to send another link to your patient's chart
If the status is "failed," it means the examination was not sent to the patient's chart. A failed status will include an error message (shown below in the blue box):

Failures are usually because the Patient ID or Order ID was not found in Athena. You can correct any erroneous information in Athena and return to this screen to resend the examination.
Patient IDs can also be corrected using the Tricefy interface (resend the study after the ID is fixed).
Note: You can also view the Interface Status of your Athena studies by adding the column to your study list, as explained further below.
Showing Interface Status on your Study List
To display the Interface Status on your Study List, select the settings cog in the upper-right corner (shown the red box) and check the Interface Status box:

When viewing your Study List, a new column will now display the interface status of each exam:

- Success: The exam was successfully sent to athena health
- Fail: The exam was not sent to athena health
- Selecting Fail in the Interface Status column will display all pertinent information, including the error message, as explained above
- No Status: The exam is not assoicated with an athena health patient
If adding an additional column to your Study List increases makes it difficult to view, adjust your the width of your columns to help minimize horizontal scrolling.
 Learn more about Study List columns, including how to adjust their widths
 Copyright ©