Automation rules automatically process images based on data (email addresses, names, labels, etc.) entered into the imaging system prior to an examination. Tricefy uses this information to automatically send studies to patients, apply labels, and other automated actions.
Click here for instructions on creating a new automatic process.
- To route images to different Tricefy account, choose Automatically Route Images to Another Account as the automation type
- This process is only applicable to users who are Account Administrators of multiple Tricefy accounts
- To route images to an external receiver, choose Automatically Route Images to an External DICOM Receiver as the automation type
- This process is only applicable to users who enabled external routing service when installing Uplink
- To route images to a Tricefy Downlink, choose Automatically Route Images to Downlink Folder as the automation type
- This process is only applicable to users who enabled the Tricefy Downlink service when installing Uplink
- This process is only applicable to users who enabled the Tricefy Downlink service when installing Uplink
For any automation, select Add New Condition to dictate what triggers the automated process. It is important to note that a condition is not required for creating an automatic process. If conditions are not added, the automatic process is always applied.
Select the red X to remove a condition.
If adding a condition, select an option from the When drop-down menu to specify when the automation is applied:

- Choosing an option under Instance will automatically route images for the following instances:
- Destination AE Title or Extension will route study images each time a specific imaging system is used
- We created two stores when configuring the ultrasound system
- These stores are typically named "archive" and "patient" -refer to your DICOM settings
- Enter the name of the store into the Equals text box
- If you are creating this automation rule to automatically download a study PDF, select Destination AE Title from the drop-down menu and enter "Study-PDF" into the Equals text box
- After creating this condition, skip to the Routing to an External Server below
- We created two stores when configuring the ultrasound system
- Is or contains a PDF will automatically route images each time the study contains a PDF document
- Leave the Equals text box blank
- Destination AE Title or Extension will route study images each time a specific imaging system is used
- Choosing an option under DICOM Fields will run the process when specific information is entered into that DICOM field
- Type the information that needs to be entered into the Equals text box
- For example, if Dr. Julie works for two Clinics with Tricefy accounts, choose Operators Name as the DICOM field and type "Dr. Julie" into the text box. Each time Dr. Julie is entered into the Operators Name field of the imaging machine, study data will route to the appropriate account
- Type the information that needs to be entered into the Equals text box
Routing to another Account
To route to a different Tricefy Account:
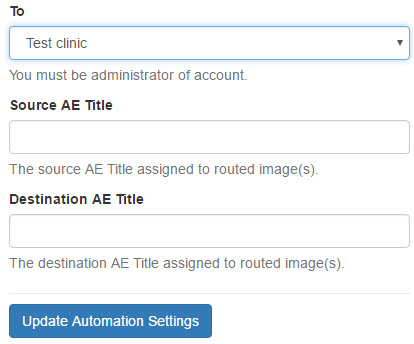
1) Enter the account name of the clinic receiving the data
2) Enter the name of the imaging system performing the exam
3) Enter the name of the imaging system receiving the exam
4) Select Update Automation Settings to save the content on this screen and return to the Automation Setup page. This process is now listed under Saved Automations, where it can be edited, deleted, or disabled.
Routing to an External Server
To route to an external server, select your Uplink from the drop-down menu:
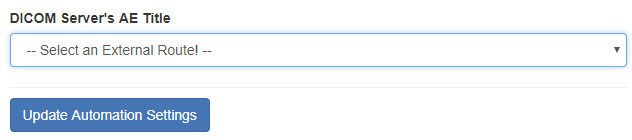
Uplinks will be listed by Display Name (as chosen during activation).
After choosing your Uplink, select Update Automation Settings to save and return to the Automation Setup screen. This process is now listed under Saved Automations, where it can be edited, deleted, or disabled.
Routing to a Downlink
To route to a downlink, select the available downlink from the drop-down menu.
 Copyright ©