Automation rules automatically process certain kind of images using metadata (email addresses, names, labels, etc.) that are embedded in the study based on the content entered into the imaging system. Tricefy uses this information to automatically send studies to patients, apply labels, and other automated actions.
To create an automated process, select Automation Setup within the Account Settings.
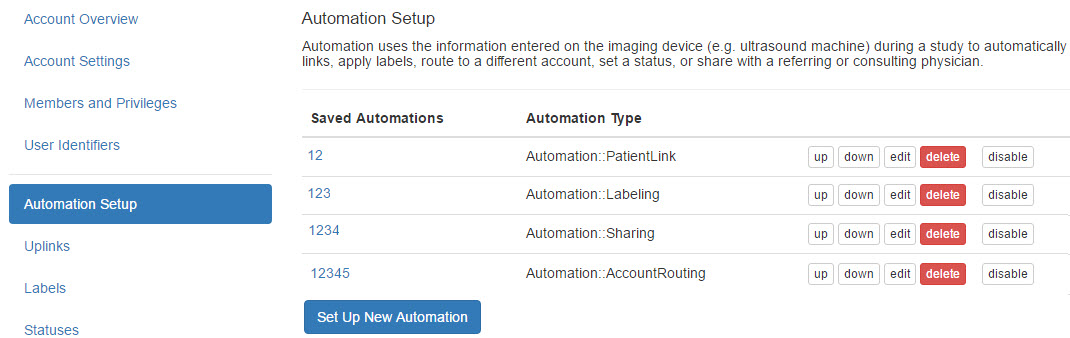
Existing processes are listed under Saved Automations. The type of automated process is listed under Automation Type, which are explained below. The Up and Down buttons change the order that they're listed.
At any point, existing processes can be modified by selecting the Edit button next to each specific process.
Select Delete to remove an automated process. Once removed, this action cannot be undone. To disable a process without removing it entirely, select Disable instead. Below is an example of a disabled process; select Enable to re-activate the process.

To create a new automated process, select Set Up New Automation:

First, type a name into the New Automation Name field. This name should describe the intended automatic process.
Next, choose a process from the Select Automation Type drop-down menu. Additional instructions for each automation type are linked at the end of this article.
- Automatically send patients a link to their images: This option scans DICOM fields for contact information (email addresses and phone numbers) to send a patient link.
- Automatically route images to another account: This option allows physicians working with multiple Tricefy accounts to route study images to the appropriate account.
- Automatically route images to an external DICOM receiver: This option routes exams to the external DICOM receiver that was prompted during Uplink installation.
- Automatically route images to a Downlink folder: This option routes files/images to a specified downlink if a Tricefy. Only available if an Uplink connected to the account has the Downlink service enabled.
- Automatically apply custom label: This option labels studies with the content of your choosing
- Automatically label images based on DICOM field: This option labels study images based on content entered into the imaging system during the exam
- Automatically share images with physicians: This options scans DICOM fields for contact information of other physicians, such as a referring physician, to share study images.
- Automatically assign status to images: This option applies a status to a study based on specified conditions.
- Automatically create and Attach a PDF report of the Study: This option auto-generates a compilation of study images into a PDF with a summary cover page
If your clinic uses Tricefy through an EMR, such as Allscripts or athenaheath, select one the appropriate process under Integrations.
- Select Automatically Generate Outbound HL7 Message if your EMR is listed
Select the Create Rule button to create the automated process; the system displays a configuration screen. Except for integrations, automated processes are triggered by conditions specified on this screen.
Triggering Events and Conditions
Every automation rule requires three things:
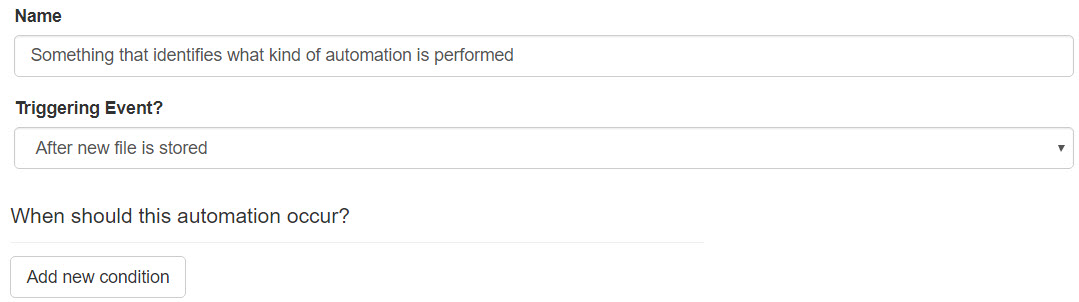
- Name: To identify each automatic process
- Triggering Event: What makes the automation occur
- Some automations can only occur after the file is stored (such as sending to patients)
- Other automations allow you to run the process before or after the file is stored, or when the status has been changed. ***
- Conditions: When the automated process should run, such as when a certain ultrasound system is used or when a specific operator performs an exam
- To add a condition, select Add new Condition
*** If selecting Study Status Changed as the triggering event, it is recommended to include a Study condition (to specify what the new status should be in order to trigger the automation. Not adding a condition will trigger the event any time the status is changed).
Next, select an option from the When drop-down menu:

- Choosing an option under Instance runs the process for specific instances
- Destination AE Title or Extension will run the automated process when a specific imaging system is used
- We created two stores when configuring the ultrasound system
- These stores are typically named "archive" and "patient" -refer to your DICOM settings
- Enter the name of the store into the Equals text box
- We created two stores when configuring the ultrasound system
- Is or contains a PDF will run the automated process when the study contains a PDF document
- Leave the Equals text box empty
- Destination AE Title or Extension will run the automated process when a specific imaging system is used
- Choosing an option under DICOM Fields will run the process when information is entered into that specific DICOM field during an exam
- Type information that needs to be entered into the Equals text box
You can add multiple conditions by selecting the Add New Condition button again. Select the red X to remove a condition.
It is important to note that conditions are not required for creating an automatic process. If a condition is not added, the automatic process is always applied.
Additional content on this screen varies depending on the process that you are automating. Refer to the following links below for further instructions:
 Setting up automatic Patient Links
Setting up automatic routing to a different Clinic Account or External DICOM Server
Setting up an automatic Labels or automatic Statuses
Setting up automatic Doctor Sharing
Setting up automatic PDFs of study images
 Copyright ©