Creating this type of automation rule will send examinations to Athena patient charts (assuming the patient ID and Order ID exist in Athena).
Please refer to the following steps to get started:
Step 1: Create your automation rule - select athenahealth as the Integration Type
Step 2: Add conditions that trigger this automation
Step 3: Complete the following information:
- Practice ID (required): This is a required field; refer to the ID number provided by Athena
- Contact your Athena representative if you do not know your Practice ID
- Department IDs (required): Enter the ID numbers for the departments in which you'll be importing data
- These numbers are located in AthenaNet by selecting the Settings (gear icon), choose "Billing" under the Admin section, followed by the "Departments" link from the menu located on the left side of the screen. In the table you will find the column with the department IDs for each location or department
- These numbers are located in AthenaNet by selecting the Settings (gear icon), choose "Billing" under the Admin section, followed by the "Departments" link from the menu located on the left side of the screen. In the table you will find the column with the department IDs for each location or department
- Performing Facility ID: enter the ID of your performing facility (only 1 allowed)
- You can find a performing facility ID in Athena by selecting the Settings (gear icon), choose "Clinicals" under the Admin section, click the "Suggest a Clinical Provider" link on the left side, and search for your facility by name and/or address. In the list of results you will see an "ID" column which is the Athena performing facility ID
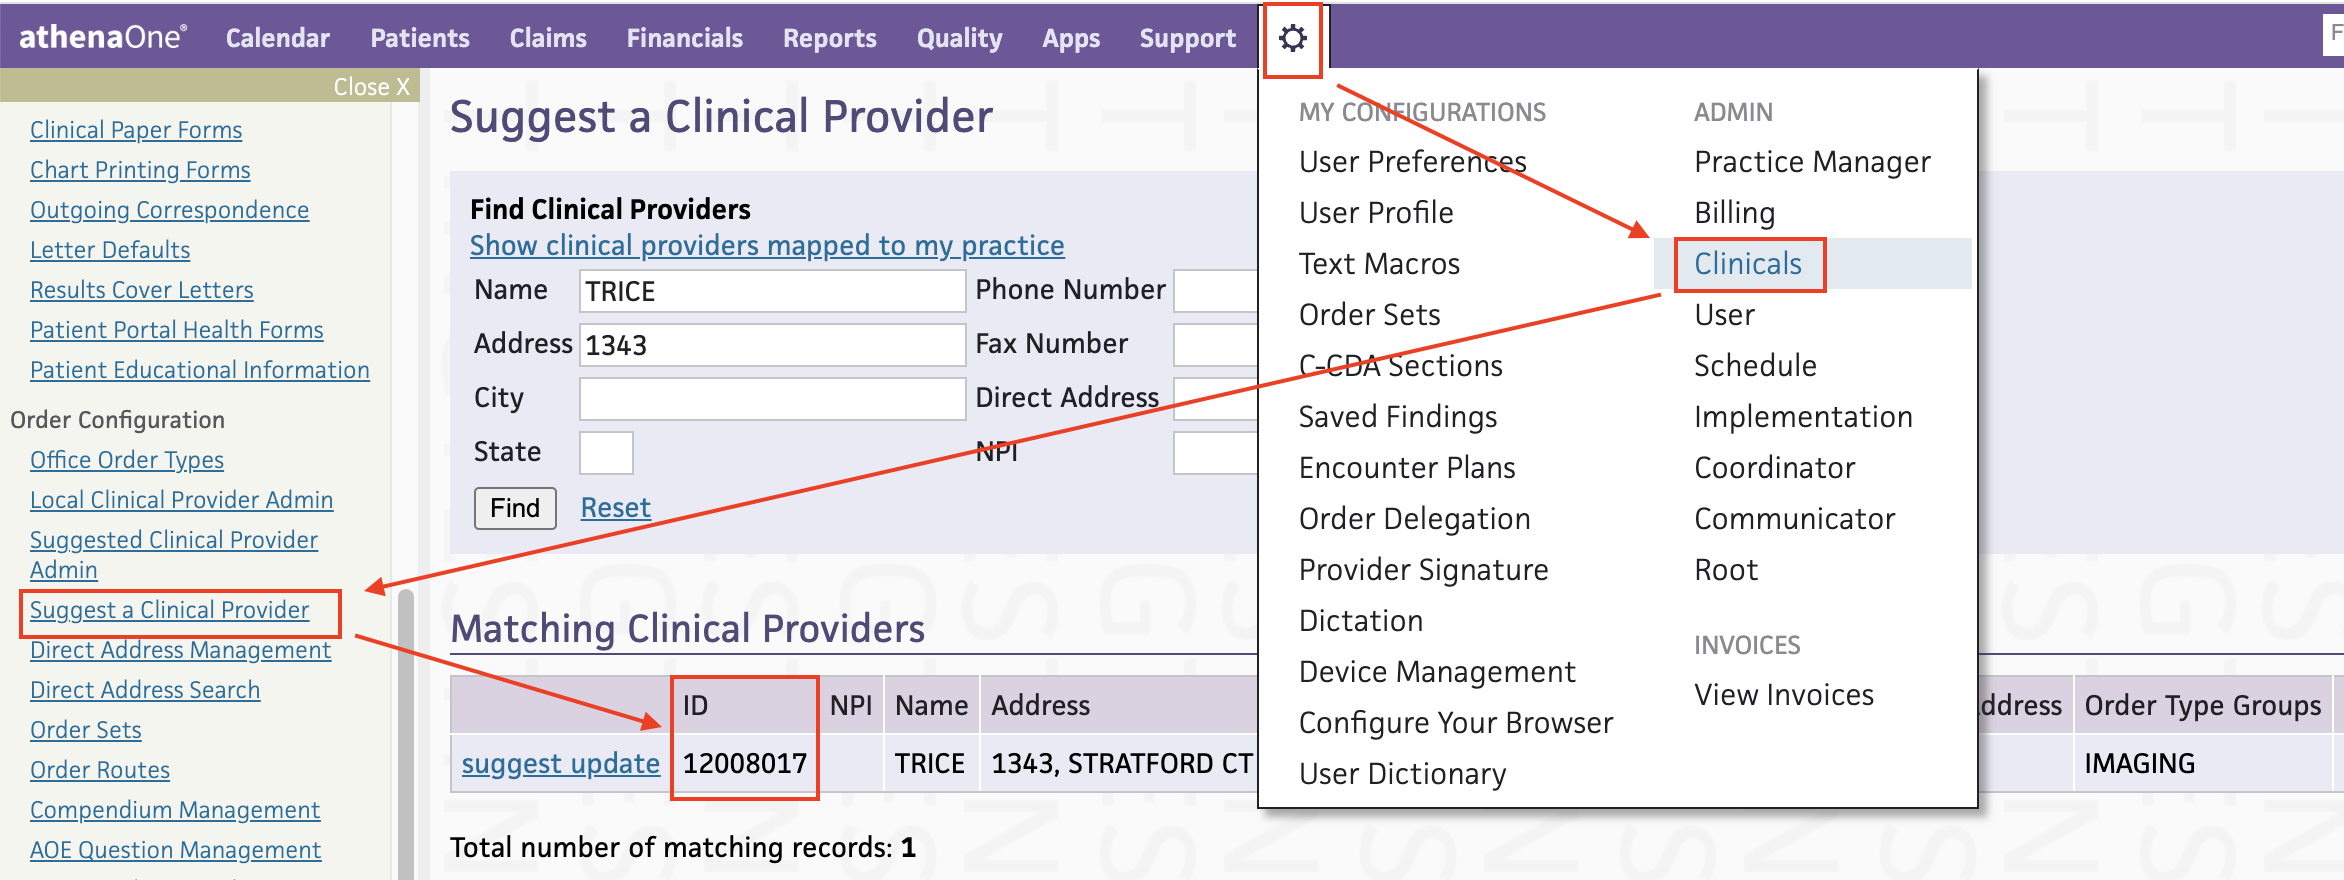
- You can find a performing facility ID in Athena by selecting the Settings (gear icon), choose "Clinicals" under the Admin section, click the "Suggest a Clinical Provider" link on the left side, and search for your facility by name and/or address. In the list of results you will see an "ID" column which is the Athena performing facility ID

- Default Provider: This option is only available if you have imported Athena providers
- Always Use Default Provider: enable to always use the selected provider, otherwise Tricefy will use a different set of logic to determine the provider
- Always Use Default Provider: enable to always use the selected provider, otherwise Tricefy will use a different set of logic to determine the provider
- Verify Patient Encounters: enable to only send links or PDFs if a patient encounter/appointment is found for the imaging exam
- Send Imaging Results Link: enable to send a Tricefy study link to the patient's chart as a separate result
- Send PDF Report to Patient's Chart: enable to send a PDF document of each study
- The Tricefy study summary PDF includes a cover page + reports (if applicable) + all exam images
- The following checkboxes on this screen (under PDF Destination) are only applicable if Send PDF Report to Patient's Chart is checked
1) Choose category type to send PDF result to from the drop-down menu:
- Imaging Results (default): PDF result will go to the patient's chart under the Imaging Results category and assigned to reading/ordering provider for review
- Encounter Documents: PDF result will go to the patient's chart under the Encounter Documents category - no review needed, auto-closed
2) Attach Imaging Results to Ultrasound Order: Tricefy will attempt to look up the corresponding order for the imaging exam and tie PDF result to it. If no order is found, the results will still be delivered to the patient chart with no order assigned (label / procedure type)
3) Auto close: the result will automatically be set to closed status in the patient chart IF AND ONLY IF a corresponding order is found
- Athena Worklist: StudyInstanceUID Always Unique: when enabled the Tricefy system will generate a unique StudyInstanceUID for every search and result from Athena
- Enhanced order matching: Use Athena order IDs to populate worklist entries, requires Appointments workflow in Athena.
When all the required information is entered, it will read Automation rule status Valid at the bottom of your screen. Select Update Athena to save the information. Your Athena Automation is now configured.
How it Works
An examination is uploaded to Tricefy (either by using your imaging system or the software itself). If the Patient ID, Encounter ID (Appointment Date and Time) and Order ID (Accession ID) exists in Athena, the study will be sent to the patient's chart.
You can confirm it was sent by selecting the study on your Study List and opening the side Info Panel. Scroll towards the bottom of the panel and select the Interface Status Details link.
Note: This link is only available for Athena users.

If the status is "success" (shown below in the red box), it means that the examination was successfully sent to the patient's chart:
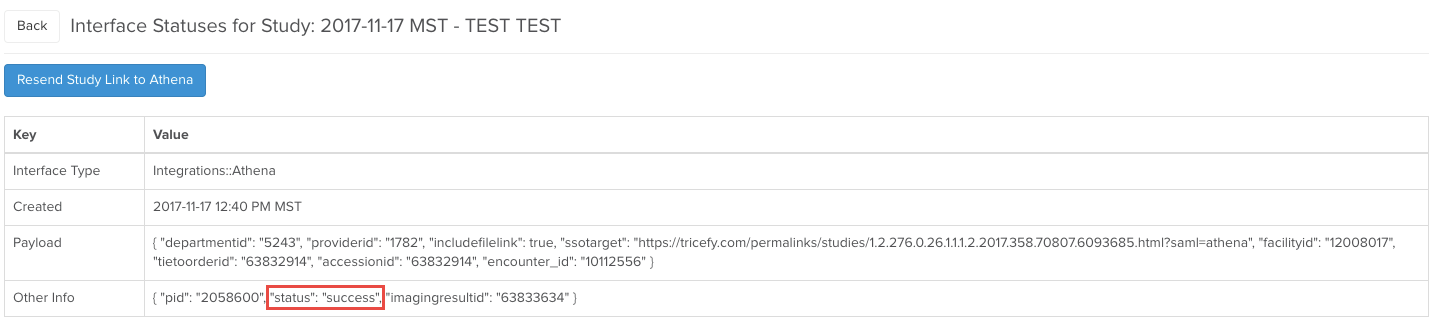
- Select Back to return to your Study List
- Select Resend Study Link to Athena to send another link to your patient's chart
If the status is "failed," it means the examination was not sent to the patient's chart. A failed status will include an error message (shown below in the blue box):

Failures are usually because the Patient ID or Order ID was not found in Athena. You can correct any erroneous information in Athena and return to this screen to resend the examination.
Patient IDs can also be corrected using the Tricefy interface (resend the study after the ID is fixed).

Viewing the Exam in Athena
To view the exam using Athena:
1) Open your patient's chart:
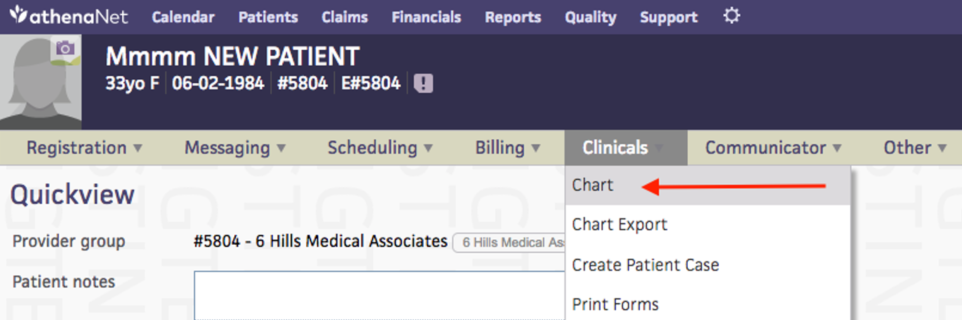
2) Select the ![]() icon on the left side of the screen to open Imaging Results
icon on the left side of the screen to open Imaging Results
3) Select the link listed under Imaging Results:

4) Select View Report Header on the upper-right of your screen (next to Print)
5) Select the Custom Link titled Trice Preview:

6) If you are currently not logged into Tricefy, you will be prompted for your password. If you do not have a Tricefy account, you will be asked to create one.
Once you are logged in, the examination will display in the Tricefy viewer.
 Copyright ©