Uplink is the software that allows your ultrasound system to communicate with your Tricefy account.
After downloading the Uplink executable, you can find it in in the Downloads folder on Windows
NOTE: Make sure that the Uplink computer is configured to remain on while receiving DICOM from imaging devices
Installation
- A standard dialogue box may ask to make changes to your computer. Select Allow.
- Choose to accept the license agreement, followed by Next
- Select service(s) to install:

Uplink DICOM Server
DICOM Server is the standard service to configure Uplink to listen for DICOM files sent by the local network imaging devices

- Server Port: specify the port the Tricefy uplink will listen for DICOM files, 1112 is the default port
- File Monitor: these settings are only applicable if sending ultrasound PDF reports to Tricefy. Leave the fields empty if you will not be sending PDF files to Tricefy
- PDF PID Segment: the location of the patient ID when each segment of the filename is separated by underscores
- 2 is the default segment for most ultrasound systems (such as GE machines)
- Monitor Path: the folder that Uplink will scan to detect to DICOM files or PDFs
- Enter the full path of the folder or click the 3 dot icon to navigate to the desired folder in the pop-up
- PDF PID Segment: the location of the patient ID when each segment of the filename is separated by underscores
- Options
- DICOM De-identification: enables the Tricefy uplink to anonymize the DICOM images locally before being sent to the Tricefy cloud.
Preserve SR: not available at this time- Preserve Patient Sharing Tags: configures uplink to keep typical DICOM tags used for patient sharing recipient info such as PatientTelephoneNumbers and PatientComments
- Please speak to a Trice representative if you need customized tags preserved
- DICOM De-identification: enables the Tricefy uplink to anonymize the DICOM images locally before being sent to the Tricefy cloud.
Downlink Service
The Tricefy Downlink Service configuration screen will prompt for the folder path you want the files to be written into and the mode.

- Path: Destination folder/directory for files to be written to. Enter the full path of the folder or click the 3 dot icon to navigate to the desired folder in the pop-up
- Mode: Which type the files should be saved as.
- Consumer Format: save image files as JPG, and video files as MP4
- Note: only PDF files (.pdf) can be saved currently with consumer format. Image and video files will be still saved as DICOM (.dcm) with this mode
- DICOM: all files sent to downlink will be saved as DICOM (.dcm)
- Consumer Format: save image files as JPG, and video files as MP4
See article link below to learn how to send files to the local downlink from the Tricefy cloud
External Routing
When selecting External Routing during the installation process, an additional window displays for specifying where to route examinations:

- IP Address: Enter the IP address of the server/PACS receiving data
- Port: Enter the destination port of the server/PACS receiving data
- Source AE Title: Enter a source AET name (default is "trice")
- Note: destination AET is configured in the local study route setup from the Tricefy account settings, see article link below for more information
 Setting up Local Routing in Tricefy
HL7 Processor
When selecting HL7 Processor during the installation process, an additional window displays for specifying inbound and outbound folders:

- Inbound folder: Destination folder for messages received by Tricefy (for Modality Worklist)
- Outbound folder: Destination folder for messages to send to EMR (for imaging results)
TCP Transport
When TCP Transport is selected (with HL7 Processor), specify the IP address(es) and port(s) where HL7 messages will be sent (outbound settings, results messages) or received (inbound settings, scheduling/order messages for worklist)
![]()
Activation
Select Next to begin the installation:

If this is the first time installing Uplink, a message will notify that a browser window will open for activating Uplink.
Select OK, followed by Finish on the final screen
Immediately after installation, a browser window displays to activate the new Uplink. If not already logged into Tricefy, a login window will display first.
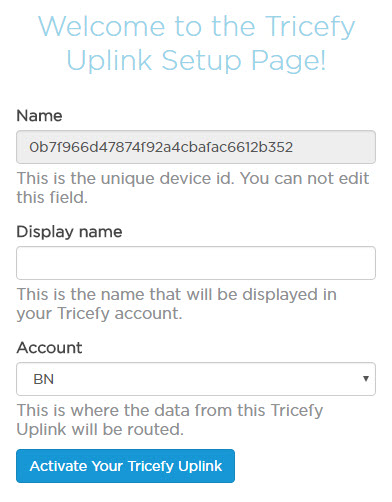
Enter a Display Name (in case your clinic has more than one Uplink, this will help you tell them apart) and verify the Account shown is the correct account (some users have multiple accounts). Press Activate Your Tricefy Uplink to complete the installation process.
Note: Reinstalling Uplink does not require additional activation.
Uninstalling Tricefy Uplink
Select Start, then select Settings > Apps > Apps & features.
Select the "Tricefy Uplink" app from the list, and then select Uninstall.
 Copyright ©