Uplink is the software that allows your ultrasound system to communicate with your Tricefy account. This is our advanced Uplink, intended for those planning to route to an external PACS server, export data from Tricefy, or send data using ViewPoint (or similar software).
If you are not using advanced features, your clinic probably has the Typical Uplink.
First-time Tricefy users will be prompted to install Uplink once they log into their account.
Additional Uplinks can be downloaded either by Account Administrators within the Account Settings (recommended), or by using a direct link.
 Instructions on downloading Uplink from within Account Settings
NOTE: Make sure that the Uplink computer is configured so that the drives do not fall asleep.
Installation
To install Uplink, run the downloaded executable. A standard dialogue box may ask to make changes to your computer. Click Allow.
A wizard will guide you through the installation process; click Next to view our license agreement. Accept the terms and click Next again:

Select Advanced Installation, followed by Next:

There are two main components to the installer:
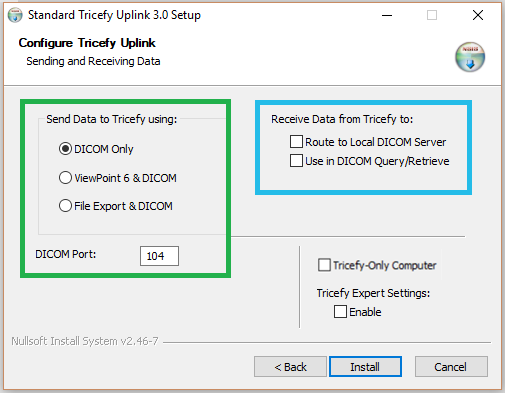
- Sending Data: These options, shown in the green box, specify how you intend to send data to Tricefy
- Options are further explained in the section below
- Receiving Data: These options, shown in the blue box, specify where you intend to route data received from Tricefy (to a PACS server or Query/Retrieve)
- If you are not routing data, leave these boxes unchecked
- Options are further explained in the section below
Check the Tricefy-Only Computer box if this computer is intended specifically for Uplink. If this computer is used for other things, it is recommended to leave the box unchecked.
There is a wide variance of functions this Uplink can perform - if such functionality applies to you, Tricefy staff will walk you through enabling the Tricefy Expert Setting. Most of us will just leave that checkbox empty.
Sending Data
Select one of the following:
- DICOM Only (Default - shown above): Choose this option if you are only sending data to Tricefy using the ultrasound system
- DICOM Port will be 104. If another application is using Port 104, the DICOM Port will be 105
- Please note that if both 104 and 105 are in use, you can enter a different Port instead. Trice recommends 11112.
- DICOM Port will be 104. If another application is using Port 104, the DICOM Port will be 105
- ViewPoint 6 & DICOM: Choose this option if you are using ViewPoint 6 software
- When this option is selected, additional fields are visible with default, pre-populated settings:
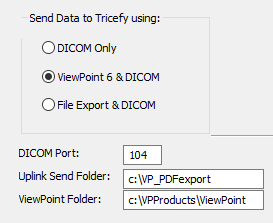
- DICOM Port will be 104. If another application is using Port 104, the DICOM Port will be 105
- Please note that if both 104 and 105 are in use, you can enter a different Port instead. Trice recommends 11112
- Uplink Send Folder is the destination of data that is exported from ViewPoint (this data will be uploaded to Tricefy)
- Modify this location to accommodate your clinic's network.
- ViewPoint Folder is the location of the installed ViewPoint software. Modify this location to where your clinic installed ViewPoint
- DICOM Port will be 104. If another application is using Port 104, the DICOM Port will be 105
- When this option is selected, additional fields are visible with default, pre-populated settings:
- File Export & DICOM: Chose this option if planning to export data before uploading to Tricefy
- When this option is selected, additional fields are visible with default, pre-populated settings:
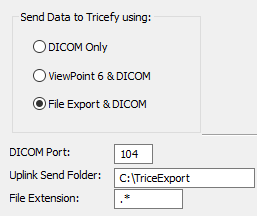
- DICOM Port will be 105 (if Port 105 is already in use, you can enter a different Port instead. Trice recommends 11112)
- Uplink Send Folder is the destination of exported data (this data will be uploaded to Tricefy)
- Modify this location to accommodate your clinic's network - this folder must be created on your network
- File Extension specifies what kind of files are allowable for export
- The default setting, .*, allows all file types to be exported. Change this file extension to limit exported data to only the specified extension (.dmc, .pdf, etc.)
- When this option is selected, additional fields are visible with default, pre-populated settings:


Receiving Data
If your clinic intends to receive data from Tricefy to route to another location, such as a PACS, select either Route to Local DICOM Server or Use in DICOM Query and Retrieve.
- If your clinic does not intend to route data, leave both boxes unchecked
- If your clinic does intend to route data, check the appropriate box to enter additional information. Content entered below will tell Tricefy where to send the data:
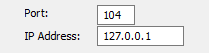
- Port: Enter the destination port of the server/PACS receiving data
- IP Address: Enter the IP Address of the server/PACS receiving data

After you finish the Uplink installation, you will have to setup routing in your Tricefy account. Refer the following instructions:
Setting up Local Routing in Tricefy
Install
After entering all applicable information, click Install to complete the installation.
A dialog box will display when the installation is complete. Take note of the displayed IP address and Port. This information will be entered into the ultrasound system during configuration.
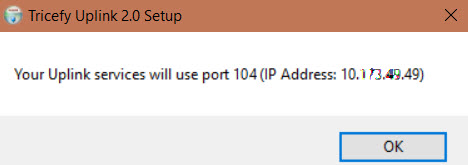
Click OK to close this window.
Additional Information
There are now two services are running in the background of your computer. These services, Trice_boxComm and Trice_storescp, communicate and transfer data with Tricefy. For this reason, it is important to ensure that firewalls or proxy servers are not configured to block these services. Restricting either service will prevent Tricefy Uplink from working.
If you are unsure about firewalls and proxy servers at your clinic, contact your IT department.
To test communication and data transfer with Tricefy, use the imaging machine to Ping and Verify after configuring the imaging machine.
Activation
Immediately after installation, a browser window displays to activate the new Uplink. If not already logged into Tricefy, a login window will display first.
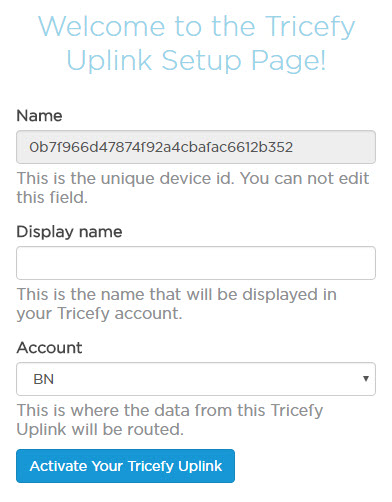
Enter a Display Name for the Uplink (in case your clinic has more than one Uplink, this will help you tell them apart) and verify the Account shown is the correct account. Press Activate Your Tricefy Uplink to complete the installation process.
Note: Reinstalling the application does not require additional activation.
Note: Mac users on an older operating system (10.6 or lower) need to contact the Tricefy Help Center or their Tricefy Administrator for activation.
 Copyright ©