Follow the process below to setup your ultrasound system.
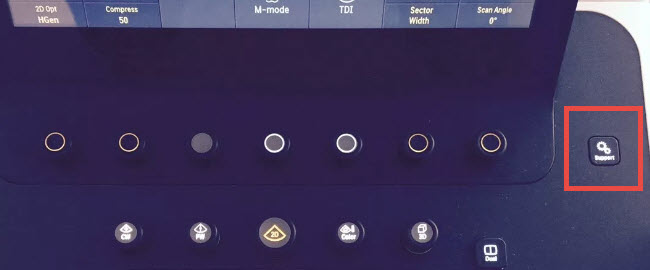
1) Click the Support button in the upper-right hand corner of the machine:
2) press the Startup button on the touch panel
3) Select the Network/DICOM Settings tab and click the DICOM Settings button
This screen may vary depending on your system configuration. We are going to add two new DICOM services, known as stores. These stores are like warehouse receiving centers; they receive the data from your ultrasound system.
We will create two stores: one for sending images to patients and one for archiving.
4) Click Add to create to the archiving store and enter the following information:
Device Type dropdown: Choose DICOM Storage Server
Device Name: Trice Medical
AET-Title: archive
Port Number: Enter the port number shown during installation (or refer to Account Settings)
IP Address: Enter the IP Address shown during installation (or refer to Account Settings)
5) Click Save
6) Click Add again to create the patient-sharing store and enter the following information:
Device Type dropdown: Choose DICOM Storage Server
Device Name: Trice Patient
AET-Title: patient
Port Number: Enter the port number shown during installation (or refer to Account Settings)
IP Address: Enter the IP Address shown during installation (or refer to Account Settings)
7) Click Save again
We can test our setup by clicking the Verify button. A Partial Verify indicates the system is setup correctly.
Tip: To increase performance, access the DICOM Settings and click Edit to find the Image Quality settings. Setting files to 85% will maintain image quality while reducing the size enough to improve transfer time.
Note: The machine cannot be in Exam Mode during configuration.
 Copyright ©